 Login
LoginManual
8. Third party chat software
Below you will find instructions how to configure popular Instant Messaging clients with MGt Live Chat service. Before you begin you will need to obtain your SIP account details:
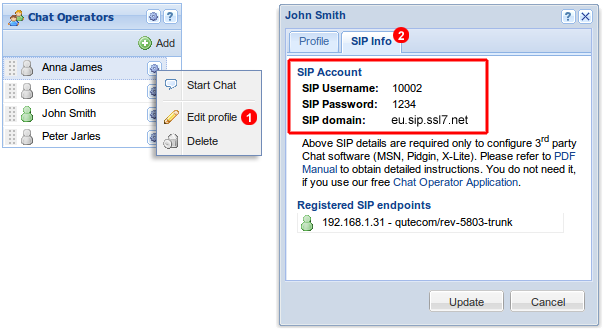
- Click gear icon
 in
in Chat Operatorspanel and selectEdit Profilefrom the menu. - Select
SIP Infotab.
Use SIP username, password and domain as shown in Figure 8.2 above to configure SIP Instant Messaging client.
Pidgin
In order to set up Pidgin with MGt Live Chat, download installation package from http://www.pidgin.im and follow instruction below:
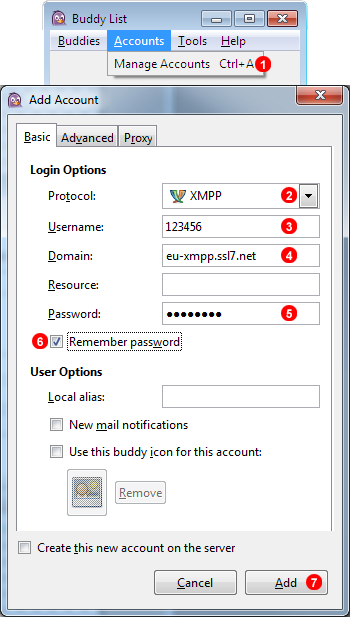
- Open
Manage Account(1)=>Add...window. - Select
SIMPLEprotocol in drop down list(2). - Enter your SIP username as shown in
SIP Infopanel - see Figure 4.3. - Enter
SIP domaininto field(4). - Enter your SIP password into field
(5). - Tick
Remember passwordcheck box(6). - Enter your name into field
(7). - Switch to
Advancedtab, and make surePublish statuscheck box(8)is ticked. - Enter
5060into field(9). - Select
Use UDPcheck box(10). - Click
OKbutton. Pidgin will now connect to our servers.
X-Lite
In order to set up X-Lite with MGt Live Chat, download installation package from http://www.counterpath.com website and follow instruction below:
- Right click on X-Lite screen.
- Select
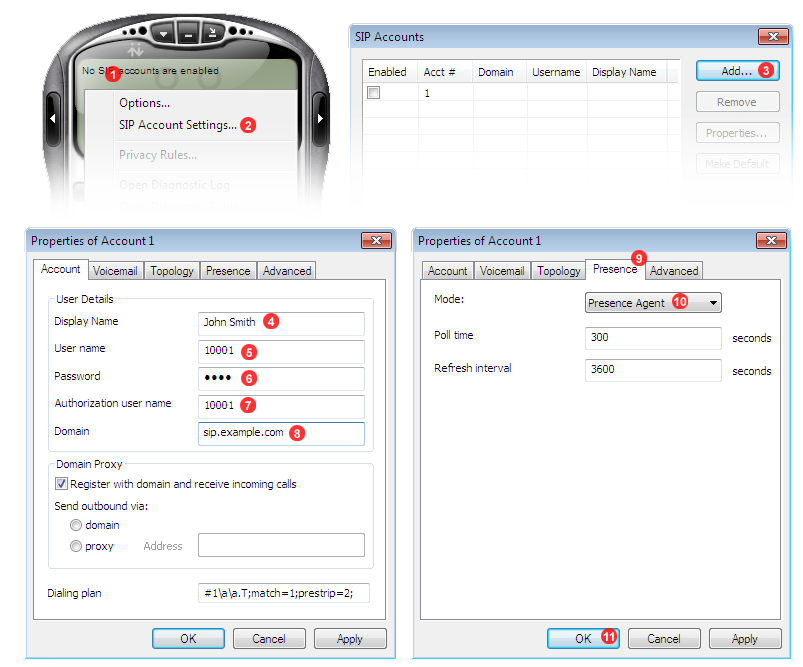
SIP Account Settings...option(2)from context menu. - Click
Add...button(3)in SIP Accounts window. - Enter your name into field
(4). - Enter your SIP Username from
SIP Infopanel - see Figure 4.3 - into field(5). - Enter your SIP Password into field
(6). - Enter your SIP Username into field
(7). - Enter SIP domain into field
(8). - Switch to
Presencetab(9). - Select
Presence Agentfrom drop down list(10). - Click
OKbutton and X-Lite will connect to our servers.
Adium (Mac only)
In order to set up Adium with MGt Live Chat, download installation package from http://adium.im/ website and follow instruction below:
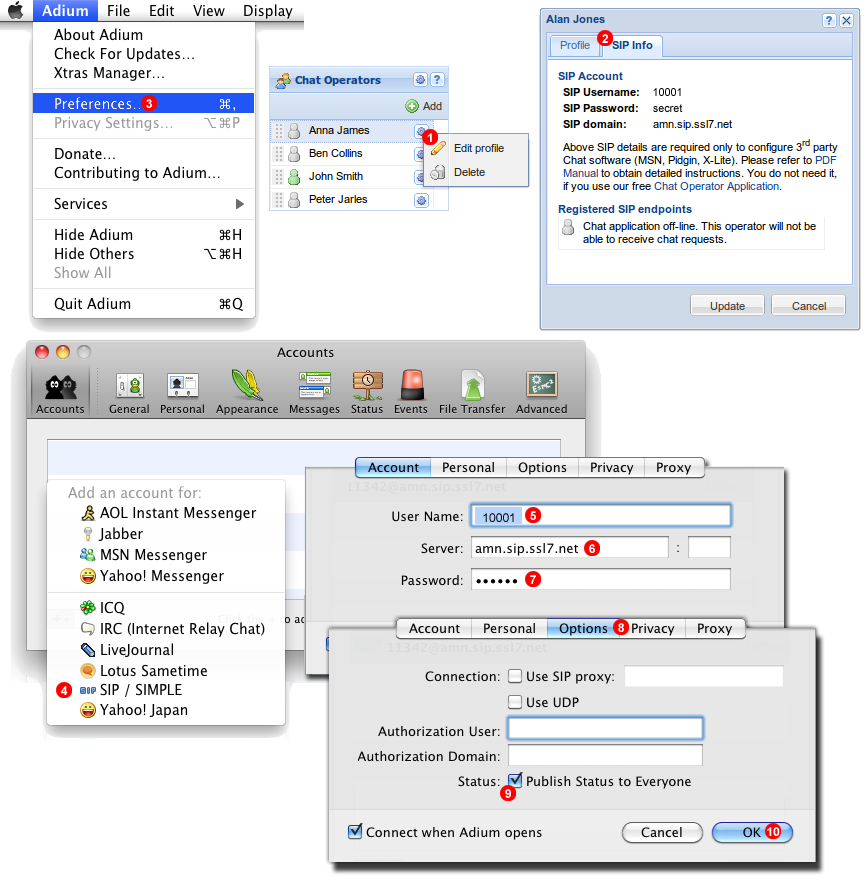
- Login into Customer Portal at http://mgtlivechat.ssl7.net/login click and click on the gear icon next to Operator's name in Chat Operators panel and select
Edit profilefrom the context menu. - Switch to
SIP Infotab - here you will find SIP Username, Password and Domain (Server) required in next steps. - Start Adium and select
Preferences...from the main menu. - Add new account of
SIP / SIMPLEtype. - Enter your User Name in the following format:
SIP Username@SIP domainas shown inSIP Infotab - see(2)in the figure 8.4 above. - Enter
SIP domainintoServerfield. - Enter your
SIP PasswordintoPasswordfield. - Switch to
Optionstab. - Tick
Publish Status to Everyonecheckbox. - Click
OKbutton.
Bria Android
In order to set up Bria Android with MGt Live Chat, download installation package from https://play.google.com/store/apps/details?id=com.bria.voip and follow instruction below:
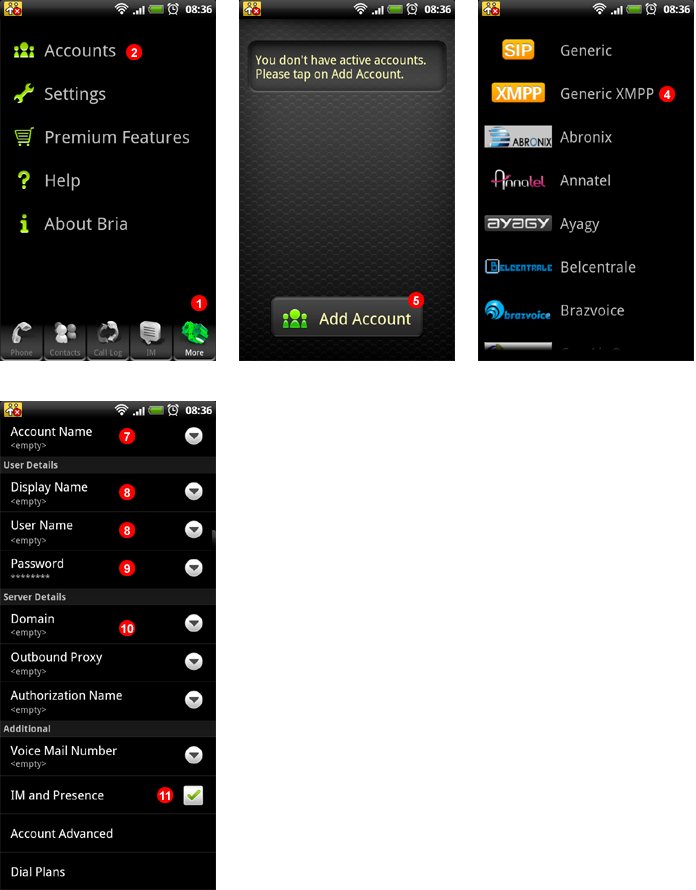
- Click
Morein the bottom toolbar. - Select
Premium Featuresfrom the menu. - Purchase
Presence and Messagingfeature. - Select
Accountmenu. - Tap on
Add Accountbutton. - Select
Genericfrom the menu. - Enter MGt Live Chat as
Account Name. - Enter your SIP Username into fields
(8). - Enter your SIP Password into field
(9). - Enter SIP domain into field
(10). - Enable
IM and Presence.

Perform a test chat session:
- Ensure you are within a data network coverage and there is Bria icon in top left corner of your device
(1). - Click on the Live Chat button on your website. Once notification is received on your Android device, tap Chat Session
(2). - Type your reply into field
(3).
Bria iPhone
In order to set up Bria iPhone with MGt Live Chat, download installation package from http://itunes.apple.com/app/bria-iphone-edition/id373968636 and follow instruction below:
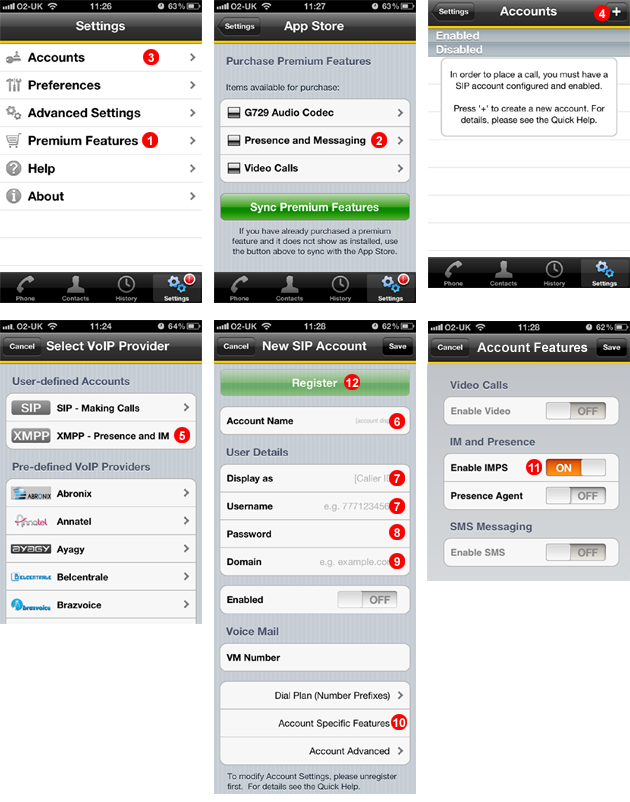
- Select
Premium Featuresfrom the menu. - Purchase
Presence and Messagingfeature. - Select
Accountsmenu. - Tap plus button to add account.
- Select
SIP - Making Callsfrom the menu. - Enter MGt Live Chat as
Account Name. - Enter your SIP Username into fields
(7). - Enter your SIP Password into field
(8). - Enter SIP domain into field
(9). - Select
Account Specific Featuresmenu. - Switch
Enable IMPSto ON. - Tap
Registerbutton.
After a short while your iPhone will register with MGt Live Chat and you will be able to receive chats from your visitors.
Bria iPad
In order to set up Bria iPad with MGt Live Chat, download installation package from http://itunes.apple.com/app/bria-ipad-edition-mobile-voip/id440744818 and follow instruction below:

- Select
Premium Featuresfrom the menu. - Purchase
Presence and Messagingfeature. - Select
Accountsmenu. - Tap plus button to add account.
- Select
SIP - Making Callsfrom the menu. - Enter MGt Live Chat as
Account Name. - Enter your SIP Username into fields
(7). - Enter your SIP Password into field
(8). - Enter SIP domain into field
(9). - Select
Account Specific Featuresmenu. - Switch
Enable IMPSto ON. - Tap
Registerbutton.
After a short while your iPad will register with MGt Live Chat and you will be able to receive chats from your visitors.